One of the main reasons I began to crochet and knit was because I really, really loved making things for people. Over the last few weeks I realised I hadn't actually made / finished anything, and as my niece and nephew were coming to visit I wanted to get some projects under way to gift to them. BUT then my daughter decided that she wanted to set me another Animal Crossing character challenge!
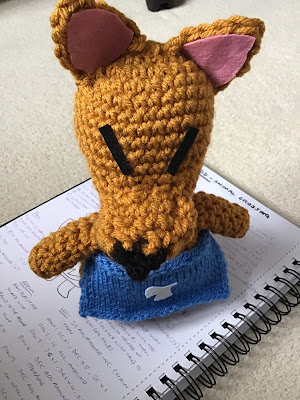
"Crazy Redd" in Animal Crossing: New Horizons is this slightly dodgy art dealer who rocks up to the island to sell paintings. He seems to wander around naked apart from a rather nifty apron (with a Ginko leaf on it).
One thing I've noticed is that there are a lot of crochet folk out there producing patterns for Animal Crossing characters but they all seem to concentrate on the 'fan faves' so for this one I would have to wing it, and produce something myself.
After a few months of crocheting I am confident enough to look at a character picture and in my head work out the sort of shapes and forms I'd need to crochet, and how to crochet them in order to produce a finished piece of work. You probably can't see it but on the Crazy Redd photos he's actually sitting on top of my rough notes

Essentially he began with the good ol' magic ring of six single crochet stitches, worked almost into an Aubergine shape for his head, with a gap left at the bottom for his nose (which was then crocheted on separately, to avoid that sort of 'bobbly nose' effect you get if you make a separate nose and sew it on badly like I nearly always do). I continued for the body (I actually made a non-wobbly neck too, I don't know if you guys struggle to make necks but I ALWAYS under-stuff the neck and my characters with bigger heads than bodies always suffer for it, developing 'limp neck syndrome'. This time though I got it right and also reinforced the neck with a few extra stitches to make sure he could stand up and keep his head up.
Lastly I divided the body cavity in half (ugh this sounds like an autopsy report!) to first crochet one leg in the round, then crochet the 2nd leg separately. I'd seen this done on a few patterns and it's a super-effective way of producing an all in one set of legs for your characters that don't again look like they're sewn on badly. It also means your character has a good chance of being able to stand unaided as this method produces quite stiff legs.
The arms, ears and the apron were all constructed separately with felt strips for his beady little untrustworthy eyes, felt inserts for his ears and a knitted apron so it had a slightly tighter fabric look than standard crochet stitches.
Lastly a nice fat bobbly tail like a fox's tail (I meant to embroider white onto the end but never got round to it).
I did write down pattern notes so if anyone wants me to turn it into a proper pattern I might just do that, drop me a comment below if so!
The other 'make' from the weekend was this really quick and easy Joker,
following a pattern by Jonas Matthias that was super-easy and simple to follow for beginners but can be embellished by more experienced crocheters to make it look even scarier than mine. My niece loves Batman and I'd made her a couple of crochet Batman amigurumis in the past, she then wanted a Joker to join them so that's how this green-haired fellow ended up being created.
One thing I learned with this one was how to (finally) do convincing hair using loops of yarn laid in rows. This technique is a little bit time consuming and painstaking at first but does definitely produce the best results so check out the link above for the full pattern and a really good method of laying in hair for your crochet models.
Follow Jonas' patterns as he tends to produce some really awesome geeky makes!
Elsewhere I have still been knitting, but am beginning to fall back in love with Crochet as I really missed just getting out a hook and some yarn and making something tangible in super-quick time. Hope you enjoy these and let me know in the comments below if you'd like me to try and write up my Crazy Redd pattern.


Comments
Post a Comment